 |
|
||
|

|
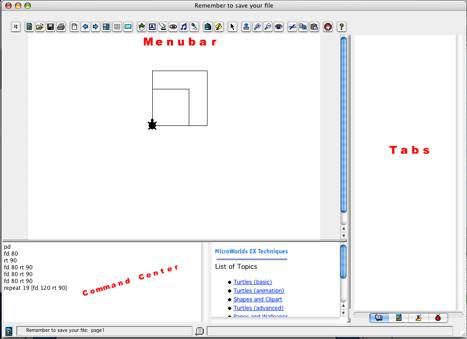
Note: The following activity uses MicroWorlds EX and MicroWorlds EX Robotics to create a simple collaborative turtle graphics and Logo programming activity that may be accomplished online or in a classroom. A more advanced quilting activity may be found here. Old-Fashioned Logo Quilt-Making with MicroWorlds EX Objective: Explore turtle graphics to create several geometric patches that may be combined with those created by your peers in the construction of a digital quilt.
The most well-known, and perhaps powerful, aspect of Logo is turtle graphics. The turtle has a pen in its middle and when it moves, with its pen down, it drags the pen – resulting in a drawing. The intuitive nature of drawing makes complex mathematical ideas concrete. Many books have been written on the topic and few classrooms ever move beyond the drawing of simple geometric figures. Turtle graphics is a powerful “microworld” for doing and learning mathematics.
MicroWorlds EX features an unlimited number of turtles. These turtles don’t just draw, they themselves can wear costumes, be animated and interact with their environment. MicroWorlds EX introduces a new data structure, the backpack. The backpack contains procedures (programs), information about the turtle multimedia objects and instructions for how to the turtle should interact with the environment. The turtle is in short, the main actor in MicroWorlds EX.
This project will keep things simple, unless you develop more sophistication, and focus on one turtle drawing. There is lots of help available in the PDF manual and the help and techniques built in the software. The following instructions are not intended to be comprehensive. Use your community of practice and online materials to fill-in the blanks. Some screens look slightly different between platforms.
Getting Started and Messing About
Basic turtle
graphics commands
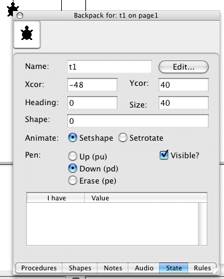
The Turtle’s BackpackEvery turtle has a backpack. It contains all sorts of
treasures. The turtle and the contents of its backpack may be exported and used
in multiple projects or even emailed to a friend.
It’s probably a good idea to name your turtle uniquely. Otherwise, MicroWorlds EX will name turtles t1, t2, t3… etc.
Procedures are the programs we write in MicroWorlds. A procedure is a list of instructions with a name. Procedures may be comprised of other procedures and the procedures built into MicroWorlds are called, primitives.
Procedures may be stored in the turtle’s backpack and then are unique to that turtle or are kept in the project’s procedures tab. Project procedures may be used by any object in the project. The project is what we call the complete file in MicroWorlds – process and product.
It’s easy to create a procedure, but they don’t always work as expected. That’s where the intellectually-rich process of debugging comes into play.
Procedures always begin with the word to followed by the name of the procedure and end with the word end. to & end need to be on their own lines.
For example:
to foo
repeat 23 [fd 57 rt 106]
end
to fooey
foo fd 75 foo
end
Foo is a procedure and fooey is another procedure that uses foo as a subprocedure. Simple Logo procedures may be combined to create complexity. You might think of them as building blocks or as verbs that do something when invoked.
Note: You edit procedures by changing them. You cannot have more than one procedure with the same name and you may not name a procedure with a word used already as a MicroWorlds primitive.
Making a Quilt PatchIn order to create a communal quilt, we need to agree upon dimensions. Let’s use the following procedure, frame, as the base for all of our patches. It creates a black 100 X 100 square.
to frame
pd
setc "black
repeat 4 [fd 100 rt 90]
end
Your Assignment Should You Choose to Accept ItOnce the frame is drawn, your job is to create colorful creative designs within the frame.
Rules: The only rule is that your turtle must return to its original position and heading at the end of the design.
Once you are delighted with your creativity, it’s time to teach the instructions to the turtle so they may be remembered and repeated. You will do so by adding a new procedure to the turtle’s backback.
to
patch
frame
end
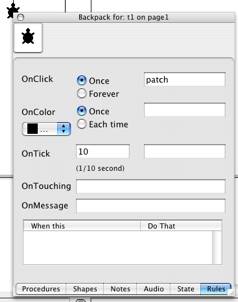
You may also program the turtle to draw the patch automatically when it is clicked on. To do so, follow these instructions:
Make Additional Patches
garys,
patch
t2,
patch
murrayz,
patch
garys, patch
Export Your Turtle(s)
Making a Quilt
The Big Challenge!!!As mentioned earlier, projects may have procedures, just
like turtles. Writing a quilt procedure in the procedures tab of the project can ask all of the turtles to
position themselves and draw their individual patch adjacent to others. Typing quilt in the command center would then draw
the entire quilt.
Repetition and symmetry are routine patterns in quilts.
|
| Home | Search |Articles | iMovie | Bookstore | Bio | Booking
Gary |
|||
| Copyright © 2003-2007 Gary S. Stager - All Rights Reserved. |